How to Create a Category in WordPress for Better Content Organization
Effective content organization in WordPress begins with well-defined categories, user experience, and search engine visibility. A structured taxonomy ensures that visitors find relevant information effortlessly while allowing search engines to interpret site hierarchy with precision. This strategic arrangement not only refines content accessibility but also strengthens SEO performance.
Whether managing a blog, e-commerce platform, or corporate website, mastering category creation is a fundamental step toward streamlined content management. Implementing a logical categorization system transforms site structure, fostering seamless engagement and optimizing discoverability for both users and search algorithms.
What Are WordPress Categories?
Categories in WordPress are used to group related posts together, helping visitors find relevant content quickly. They serve as a broad classification system, allowing website owners to structure their articles efficiently.
Unlike tags, which provide more specific details, categories offer a hierarchical arrangement. This means you can create parent and subcategories to refine content organization further.
How to Create a Category in WordPress
Creating a category in WordPress is a straightforward process. You can do it through the dashboard under the “Posts” section. Here’s a step-by-step guide to adding a new category:
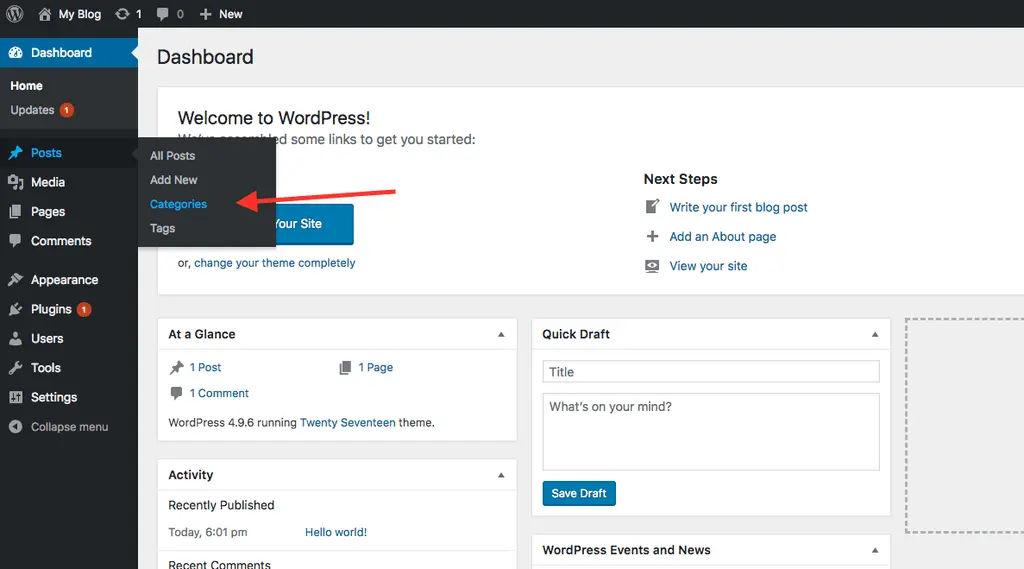
Step 1: Access the Categories Section
- Log in to your WordPress dashboard.
- Navigate to Posts > Categories in the left sidebar.
This section allows you to create, edit, and manage categories efficiently. If you’re working with a large website, this will help streamline your content into logical sections.
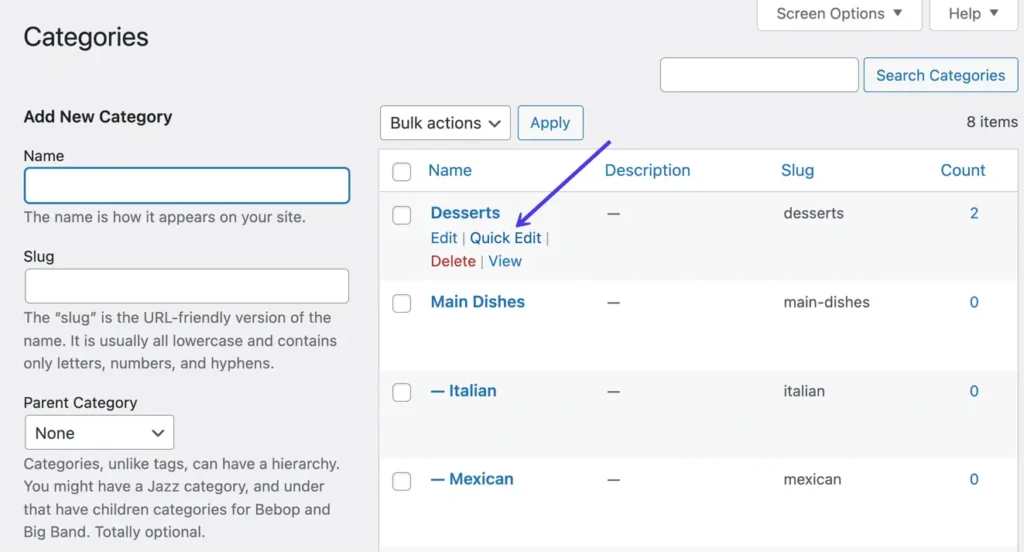
Step 2: Add a New Category
- Locate the “Add New Category” section.
- Enter a category name that accurately represents your content.
- Create a slug (URL-friendly version of the category name) or leave it blank for automatic generation.
- If applicable, select a parent category to establish a hierarchy.
- Add a description (optional but useful for SEO).
- Click the Add New Category button.
Once added, your category will be available for assignment to posts.
Step 3: Assign Posts to the Category
- Go to Posts > All Posts and select the post you want to categorize.
- In the post editor, find the “Categories” box on the right side.
- Check the box next to the relevant category.
- Click Update or Publish to save the changes.
By categorizing posts correctly, you enhance site navigation, helping users and search engines locate relevant content more efficiently.
How to Edit or Delete Categories in WordPress
As your website grows, you may need to modify or remove categories to maintain organization. This is how you can do this:
Editing a Category
- Go to Posts > Categories in the WordPress dashboard.
- Locate the category you want to edit and click Edit.
- Modify the name, slug, or description as needed.
- Click Update to save the changes.
Deleting a Category
- Navigate to Posts > Categories.
- Hover over the category and click Delete.
- Confirm the deletion (WordPress will reassign posts to the default category if necessary).
Be cautious when deleting categories, as it may affect content organization and internal linking.
What are the Best Practices for Using WordPress Categories
To maximize the benefits of categories, follow these best practices:
Use a Logical Structure
Create a well-organized category hierarchy. If you run a tech blog, for example, “Software” and “Hardware” could be parent categories, while “Operating Systems” and “Gadgets” serve as subcategories.
Limit the Number of Categories per Post
While WordPress allows multiple categories per post, it’s best to use only one or two to maintain clarity and prevent SEO complications. Assigning too many categories can create duplicate content issues, causing search engines to struggle to determine the most relevant version to rank. This can dilute ranking potential and negatively impact site structure.
Optimize Category Pages for SEO
Category pages can rank in search engines, making them valuable for driving organic traffic. To optimize their visibility, include unique descriptions that clearly define the category’s purpose, incorporating relevant keywords naturally to align with search intent. Avoid duplicate content by crafting original, informative summaries that differentiate each category.
Keep Category Names Short and Clear
Keep category names short, clear, and meaningful to enhance user experience and SEO performance. Overly long or complex names can confuse visitors and make steering cumbersome. A concise, well-structured title ensures that users immediately understand the category’s purpose, leading to better engagement.
Review and Update Categories Regularly
As your website grows, regularly audit and refine your category structure to maintain relevance and usability. Outdated or redundant categories can clutter instructions, making it harder for users to find content efficiently. By merging similar categories or eliminating unnecessary ones, you create a streamlined and intuitive browsing experience.
Conclusion
A well-structured category system is the backbone of an organized WordPress site. By strategically creating, optimizing, and managing categories, you enhance guide, streamline content discovery, and strengthen SEO performance.
Avoid excessive categorization, refine category pages with unique descriptions and relevant keywords, and routinely reassess your structure to maintain efficiency